Circular pocket tutorial with french seams - including pattern!
As requested by many of you lovely ladies, I've written a tutorial on how I made my circular pockets on my recent Current Favourite Dress (thank you for all the lovely comments too!). I've been home sick today - it's so frustrating when one feels too foul to do anything vaguely productive and is forced to watch crappy TV. Anyway, I've rallied this evening, even managing to work out how to upload my pattern onto Google Doc's in PDF format for you! This is exactly the same pattern I drafted, except mine is a little shallow, so I've made the pocket slightly deeper but I'd suggest you don't carry your diamonds in these pockets as the opening is pretty wide. It looks like my scanner has kept the sizing pretty close to the original - it's maybe 1mm out, but for pockets I think it'll be fine.

Download your pattern here! Don't forget when printing to set the scale to 100% or whatever you normally do when printing a pattern PDF. Please also be aware that I drew this all by hand, hence the extremely homemade appearance. My handwriting sucks. That's as neat as it gets. I also drew this on A4 paper - if you have issues printing it on other sized paper and it chops some off and you need to stick pages together as a guide the long straight edge measures 8 3/4 inches.....
The side seam seam allowances are the standard 5/8 inch or 15mm, as are the seam allowances for sewing the curved cutout and around the pocket bags, but you could always make the pocket bag seam allowances smaller to make the pockets a bit roomier. As I used french seams throughout many of the seams we'll be dividing the seam allowances. If your garment's side seams do not have a 5/8 inch seam allowance you will need to alter the pocket pattern accordingly.
Step 1
Print 2 copies of the pattern, cut one out complete, and cut the second pattern out along the dotted curved line, keeping all 3 pieces. The complete pattern piece I'm going to call the facing, and this is to be cut out in the fabric that you want to be visible at the back of your pocket (i.e. the fashion fabric). The pocket piece with the circular bit cut out will be the pocket lining and this can be in any fabric - mine was a heavier weight cotton. The curved small pattern piece will be the shape you fearlessly cut out of the front piece of your dress/skirt. To make it a fearless process I highly recommend you whip up a practice version of the pocket to be 100% sure you've got it all nutted out. That's what I did.

Step 2
Cut out 2 pieces of fashion fabric using the facing pattern, and 2 pieces of the lining fabric using the lining pattern piece. Work out where you want the openings to be on your dress/skirt - I had to work it out myself as the Laurel dress doesn't have side seam pockets. Basically those 2 dots that you use as a sewing guide when sewing around your pocket pieces on standard in-seam pockets are about where you'll use the small front cut out piece.


Step 3
Cut out the cutout shapes on the front of the garment, then sew the right sides of the pocket lining to the right side of the garment front, along the curve. Trim the seam to 3/8 of an inch, press the lining under and under stitch particularly if you don't intend to top stitch. I didn't under stitch because I was planning to top-stitch.

Step 4
Now we attach the pocket facing. This is a little bit awkward but absolutely achievable and totally worth it for a clean, sexy, french seam finish. You've flipped your pocket lining under, pressed it under nicely and hopefully under stitched. Now pin the WRONG side of the pocket lining to the WRONG side of the pocket facing around the pocket bag big curved edge and sew at 2/8 inch seam allowance. Trim any stray threads, turn inside out and press the seam - a pressing ham is useful at this point. Press it all flat and sew the RIGHT sides together now, at a 3/8 inch seam allowance. Press it all flat nicely and admire. Obviously repeat for the other side....
Step 5
If topstitching the pocket is desired this is the next step (in my test run I did it as part of Step 3 but it was too hard to then do the french seam pocket bags). Pin through the dress/skirt front and the pocket lining ONLY (make sure the pocket facing is floating free behind) and topstitch around the curve. I stitched mine at 3/4 inch using topstitching thread. I think I would always topstitch to keep the pockets more stable - if you want it more subtle just use your regular matching sewing thread.


Step 6
Now it's time to assemble the side seams of the whole garment. Line up the edges of your garment front with the edges of the pocket facing so everything is nice and flat. You may wish to baste these layers together. I just pinned them because I frenched my side seams and could keep an eye on them from the front. To french place the WRONG side of the garment back facing the WRONG side of the front dress/pocket units and stitch the side seam using a 2/8 inch seam allowance. Trim any loose threads, press it all open, then turn inside out and stitch the two right sides together using a 3/8 inch seam. There are a few layers where everything overlaps and gets a bit thick so take care you have no skipped stitches.

Now you'll have beeyootiful circular pockets, tidy, no raw edges - lovely! I chose to topstitch down the seam allowances from the outside because I wanted the detail against my denim fabric.

Please let me know if there are any steps that don't make sense or seem plain old wrong. And let me know if you make some awesome curved pocket openings! For variation you could easily make the opening less curved and more subtle, just by changing the curve of that dotted line:

Have fun experimenting. I'm off to Sydney this weekend with my beloved and my frock for our first wedding anniversary - I can't wait!
Download your pattern here! Don't forget when printing to set the scale to 100% or whatever you normally do when printing a pattern PDF. Please also be aware that I drew this all by hand, hence the extremely homemade appearance. My handwriting sucks. That's as neat as it gets. I also drew this on A4 paper - if you have issues printing it on other sized paper and it chops some off and you need to stick pages together as a guide the long straight edge measures 8 3/4 inches.....
The side seam seam allowances are the standard 5/8 inch or 15mm, as are the seam allowances for sewing the curved cutout and around the pocket bags, but you could always make the pocket bag seam allowances smaller to make the pockets a bit roomier. As I used french seams throughout many of the seams we'll be dividing the seam allowances. If your garment's side seams do not have a 5/8 inch seam allowance you will need to alter the pocket pattern accordingly.
Step 1
Print 2 copies of the pattern, cut one out complete, and cut the second pattern out along the dotted curved line, keeping all 3 pieces. The complete pattern piece I'm going to call the facing, and this is to be cut out in the fabric that you want to be visible at the back of your pocket (i.e. the fashion fabric). The pocket piece with the circular bit cut out will be the pocket lining and this can be in any fabric - mine was a heavier weight cotton. The curved small pattern piece will be the shape you fearlessly cut out of the front piece of your dress/skirt. To make it a fearless process I highly recommend you whip up a practice version of the pocket to be 100% sure you've got it all nutted out. That's what I did.
Step 2
Cut out 2 pieces of fashion fabric using the facing pattern, and 2 pieces of the lining fabric using the lining pattern piece. Work out where you want the openings to be on your dress/skirt - I had to work it out myself as the Laurel dress doesn't have side seam pockets. Basically those 2 dots that you use as a sewing guide when sewing around your pocket pieces on standard in-seam pockets are about where you'll use the small front cut out piece.
Step 3
Cut out the cutout shapes on the front of the garment, then sew the right sides of the pocket lining to the right side of the garment front, along the curve. Trim the seam to 3/8 of an inch, press the lining under and under stitch particularly if you don't intend to top stitch. I didn't under stitch because I was planning to top-stitch.
Step 4
Now we attach the pocket facing. This is a little bit awkward but absolutely achievable and totally worth it for a clean, sexy, french seam finish. You've flipped your pocket lining under, pressed it under nicely and hopefully under stitched. Now pin the WRONG side of the pocket lining to the WRONG side of the pocket facing around the pocket bag big curved edge and sew at 2/8 inch seam allowance. Trim any stray threads, turn inside out and press the seam - a pressing ham is useful at this point. Press it all flat and sew the RIGHT sides together now, at a 3/8 inch seam allowance. Press it all flat nicely and admire. Obviously repeat for the other side....
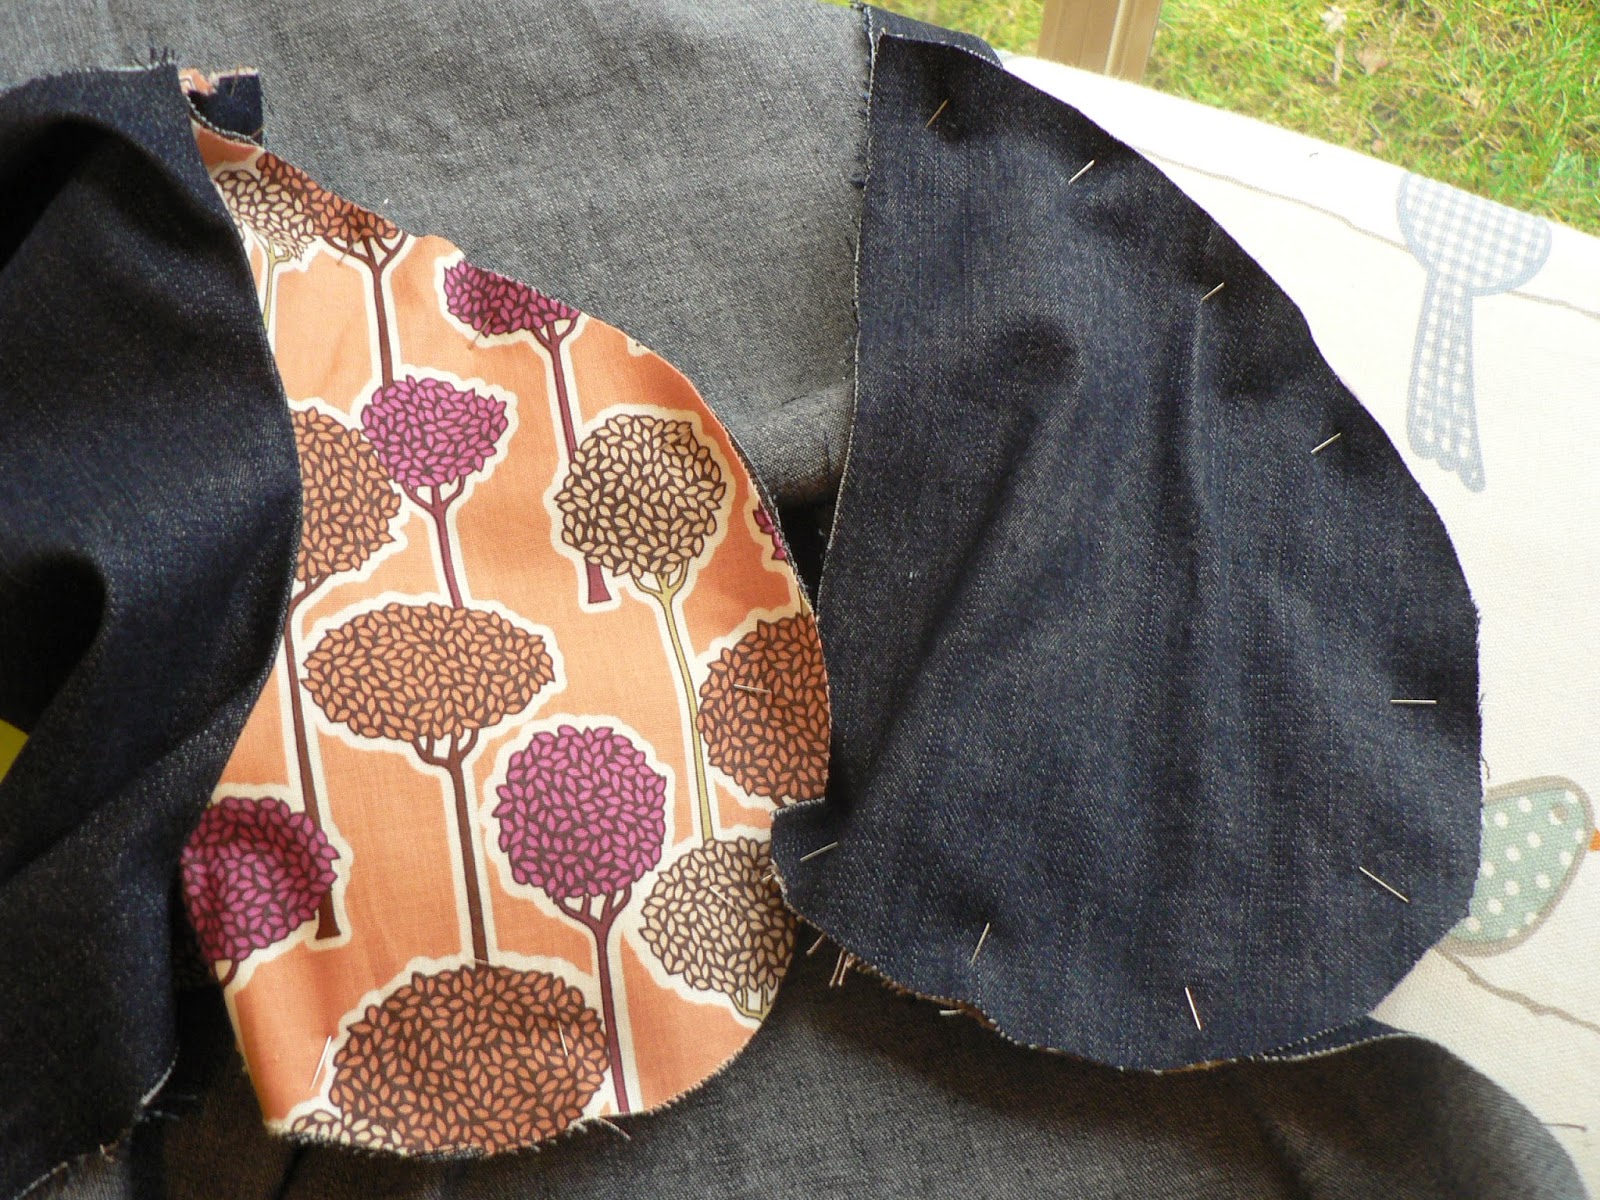 |
| Wrong sides of pocket bags pinned together for the first seam of le frenchie |
 |
| First seam being pressed open over the pressing ham |
If topstitching the pocket is desired this is the next step (in my test run I did it as part of Step 3 but it was too hard to then do the french seam pocket bags). Pin through the dress/skirt front and the pocket lining ONLY (make sure the pocket facing is floating free behind) and topstitch around the curve. I stitched mine at 3/4 inch using topstitching thread. I think I would always topstitch to keep the pockets more stable - if you want it more subtle just use your regular matching sewing thread.
Step 6
Now it's time to assemble the side seams of the whole garment. Line up the edges of your garment front with the edges of the pocket facing so everything is nice and flat. You may wish to baste these layers together. I just pinned them because I frenched my side seams and could keep an eye on them from the front. To french place the WRONG side of the garment back facing the WRONG side of the front dress/pocket units and stitch the side seam using a 2/8 inch seam allowance. Trim any loose threads, press it all open, then turn inside out and stitch the two right sides together using a 3/8 inch seam. There are a few layers where everything overlaps and gets a bit thick so take care you have no skipped stitches.
Now you'll have beeyootiful circular pockets, tidy, no raw edges - lovely! I chose to topstitch down the seam allowances from the outside because I wanted the detail against my denim fabric.
Please let me know if there are any steps that don't make sense or seem plain old wrong. And let me know if you make some awesome curved pocket openings! For variation you could easily make the opening less curved and more subtle, just by changing the curve of that dotted line:
Have fun experimenting. I'm off to Sydney this weekend with my beloved and my frock for our first wedding anniversary - I can't wait!
Nice work, these pockets are ace. Happy anniversary weekend!
ReplyDeleteCheers Katie, thankyou!
DeleteThank you … nice tutorial very well explaied These pockets look so great and the dress they’re on is really cute :) Have a nice trip and anniversary!
ReplyDeleteThanks Sasha, really pleased to find your blog!
DeleteThanks Sarah! Now I will HAVE to make one of these....
ReplyDeleteGo on! We can start a Melbourne trend!
DeleteHow did I even miss the original circular pockets in garment....Man, these are kewl!!! :)
ReplyDeleteThankyou! I'm pretty chuffed with them too! :)
DeleteBrilliant. Thanks for the pocket tutorial Sarah. Have an awesome anniversary weekend x
ReplyDeleteHope it's helpful! Thanks Caroline! X
ReplyDeleteBless your heart. Feeling under the weather AND you still rallied to share this with others. Thank you. I'll be reding this post and no doubt other parts of your blog.
ReplyDeleteCheers,
Lyric
http://www.sewcroandquilt.wordpress.com
Oh my, this is a dress! Okay, I have got to convert into a way cute skirt. It'll look better on me than a dress. Thanks so much for the basic pattern for I would never have thought this out on my own.
DeleteCheers,
Lyric
Thanks mate - enjoy, thanks for coming by and let me know how the skirt goes - I've got plans for these pockets in a beignet of my own....
DeleteThanks for this tutorial. I'm sure I'll be putting it to use sooner rather than later.
ReplyDeleteHappy 1st Wedding Anniversary, I celebrated my 14th a couple of days ago.
Hi Sam, thanks so much - hope they turn out well! And congratulations on your 14th anniversary - as I speak I'm in the airport lounge having just finished some bubbles and trying not to pass out from the mixture of booze and cold n flu meds - happy days :)
DeleteGreat pockets! I love how you used templates to add them later after cutting out your dress.
ReplyDeleteThanks Jo!
DeleteThanks for a great tutorial; I'll have to give this a try soon. Hope you have a wonderful anniversary!
ReplyDeleteThanks mate!
DeleteYay! So cute! Thank You!
ReplyDeleteHello,
ReplyDeleteI've been searching on the sigma dress inspirations and came by your dress. It looks amazing and fantastic pockets. Thank you . Hoping to follow more of your blog xx
Thanks Kit - glad you like it. I wear it so much and each time love it more and more! Hope the idea is of some use to you! Thanks for coming by.
Delete